Store Your Bluesky Data on Your Own Server (Self-Hosted PDS)

Introduction
In this post, I won't explain what Bluesky is or why you should use it instead of X (formerly Twitter). I’ll assume you already know that Bluesky is a decentralized social network where different services (storage, backend, client, etc.) can be self-hosted. Instead, I’ll focus on how you can store your own data within this decentralized network.
If you’re unfamiliar with Bluesky, you can check out their official website and this simple and sweet blog post about its distributed system architecture.
What is PDS?
PDS (Personal Data Server) is a server that stores your data, such as your account information and the posts you create. Bluesky uses PDS servers to retrieve user data, process it through Appviews, and deliver it to all clients.
You can think of PDS as a public distributed storage network that anyone can contribute to.
You can find more detailed information about PDS in this document.
Requirements
- A server (minimum 1 CPU core, 1 GB RAM) with a public IP address and firewall rules allowing traffic on ports 80 and 443. (I recommend Hetzner or Vultr)
- An operating system: Ubuntu 20.04/22.04 or Debian 11/12 preferred
- Docker and Docker Compose are installed
- A domain name
You'll need an external email service like SendGrid or Mailgun to send confirmation emails if you choose DigitalOcean.
Installation
We'll use a simple Docker Compose template to deploy a PDS instance.
DNS Setup
First, after getting your server’s IP address, create two A records on your DNS provider (Cloudflare, Namecheap, etc.) that point to this IP:
bsky.example.com— the main domain for your PDS*.bsky.example.com— wildcard subdomain for user identifiers
Subdomains will be used to generate user handles. For example, with bsky.example.com as your PDS domain, users could have handles like melica.bsky.example.com, thom.bsky.example.com, etc.
Example DNS records setup in Cloudflare:

Config file setup
First, clone the GitHub repository:
git clone https://github.com/aykhans/bsky-pds-easy.git && cd bsky-pds-easyThis repository includes:
- A
docker-compose.yamlfile (for PDS and Caddy server) - A
Caddyfileconfiguration - A
pds.env.examplefile to configure your PDS settings
Next, create your environment file:
cp pds.env.example pds.envNow, populate the necessary variables. You can easily generate secure secrets with the following commands:
Generate PDS_JWT_SECRET:
sed -i "s/PDS_JWT_SECRET=/PDS_JWT_SECRET=$(openssl rand --hex 16)/" pds.envGenerate PDS_ADMIN_PASSWORD:
sed -i "s/PDS_ADMIN_PASSWORD=/PDS_ADMIN_PASSWORD=$(openssl rand --hex 16)/" pds.envGenerate PDS_PLC_ROTATION_KEY_K256_PRIVATE_KEY_HEX:
sed -i "s/PDS_PLC_ROTATION_KEY_K256_PRIVATE_KEY_HEX=/PDS_PLC_ROTATION_KEY_K256_PRIVATE_KEY_HEX=$(openssl ecparam --name secp256k1 --genkey --noout --outform DER | tail --bytes=+8 | head --bytes=32 | xxd --plain --cols 32)/" pds.envThen, manually set the following fields in your pds.env:
PDS_HOSTNAME=bsky.example.com
PDS_EMAIL_SMTP_URL=smtps://username:password@smtp.emailserver.com/
PDS_EMAIL_FROM_ADDRESS=from@example.comPDS_EMAIL_SMTP_URLandPDS_EMAIL_FROM_ADDRESSare optional for basic functionality.
However, they are required if you want users to be able to verify their email addresses.
Start the Services
Now, simply run:
docker compose up -dThat’s it! Your self-hosted data storage for Bluesky is ready! 🎉
Manage Your PDS
You can create and manage user accounts using the Dockerized PDS admin tool.
Create an account:
docker run -it --rm --env-file ./pds.env aykhans/bsky-pdsadmin account createAfter creating an account, it should return something like this:
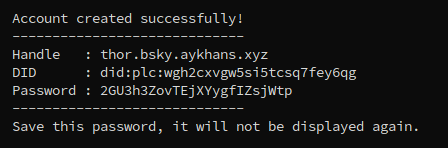
You can find more admin commands and instructions at https://github.com/aykhans/bsky-pdsadmin-dockerized.
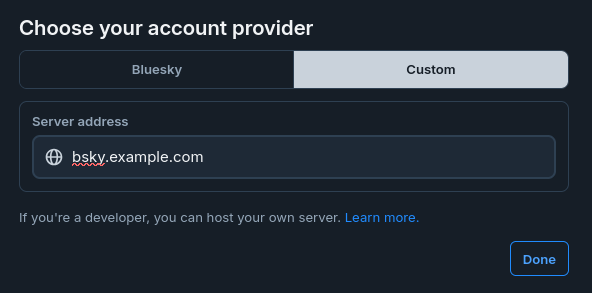
Log into Bluesky
Now, with the credentials you created, go to the Bluesky sign-in page and click Hosting Provider to set it to your custom domain (bsky.example.com).
Example:
Log in with your username and password, and that's it!
Congratulations! 🥳
You now have a fully functional, self-hosted Bluesky Personal Data Server (PDS)!
You can get my posts via RSS: https://aykhans.me/rss/